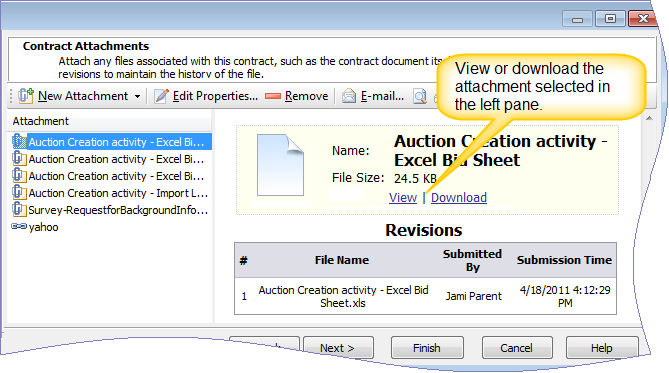
Associate supporting documents with a contract by uploading them here or you can create a link to an external URL (website). The Attachments page shows a list of attachments in the left pane and details about the currently selected attachment in the right pane.
From the Contract Attachment page you can:
- Attach files to the contract
- Manage revisions for attached files
- Attach links to external URLs to the contract
- Send file attachments to contract attendees
- Remove attachments and links
»To add a file attachment to a contract
- Click New Attachment on the toolbar and select Upload File from the menu. Contract Management displays the Open window.
- Navigate to the location of the file(s) you want to attach, select one or more files, then click Open. To select multiple files at once, click the first file, press CTRL + SHIFT on the keyboard and click the last file, or press the SHIFT key and click multiple individual files.
- Smart Contracts returns to the Attachments page displaying the files you attached in the right pane.
Managing File Revisions
Contract Management supports multiple revisions for attached files. You can add revisions to file attachments and indicate which revision is current. The current revision is the one that is visible/downloadable from the Contract Attachments page.
»To add or edit revisions of an attached file
- Select the file on the Attachments Page and click the Edit Properties button on the toolbar to open the Attachment Properties window.
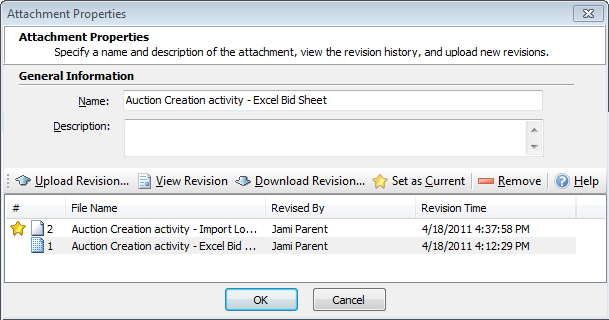
- Add a revision by clicking the Upload Revision button on the toolbar. Contract Management displays the Open window. Navigate to the location of the revised file and click Open. Contract Management returns to the Attachment Properties page with the revised file listed. You can view, download, and remove individual revisions by selecting the revision in the list and clicking the View Revision, Download Revision, or Remove button on the toolbar.
- Specify which revision you want to be current by selecting it in the list and clicking the Set as Current button on the toolbar.
- Click OK to save changes and return to the Contract Attachments page.
»To attach an external URL to a contract
- Click New Attachment on the toolbar and select External URL from the menu.
- Contract Management opens the External Document Link Properties Window. Enter a name for the link and the URL and Click Finish. Contract Management displays the link in the list on the Attachments page.
»To send attached files to contract attendees:
- You can send an email with attached files to contract attendees. Select the file in the Attachments list and click the E-mail button on the toolbar. Contract Management opens the Send an Email window with the selected file already attached.
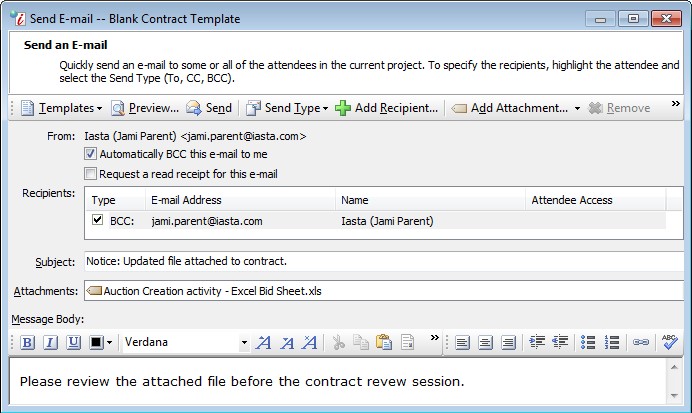
- To select an E-mail Template, click the Templates button
 on the toolbar and select "Select Template" from the menu. To insert fields such as contract name into the Subject or Message area of the E-mail, click the Templates button and select Insert Fields. For more information on the available features for sending emails, click the Help button on the Send an Email window.
 - Click
 on the toolbar to preview the E-mail in a separate window. Click Close to close the preview window.
NOTE: All written text in the message body of the E-mail is double spaced. To force single spacing within an E-mail, press SHIFT + ENTER at the end of each line. - When you finish creating the message content and subject line and have selected recipients for the e-mail, click Send on the toolbar.
Navigating Contract Properties
The Contract Properties window includes several pages for editing and managing contract elements. Use the navigation pane on the left to go directly to a specific page or use the Back and Next buttons at the bottom of the window to navigate through each page in order.
Related Topics