Save time getting new supplier companies and users into your Iasta SmartSource subdomain by importing.
Importing can save time and data entry effort as well as ensure accuracy of information and minimize errors. You can import users and associate them with existing companies, import users and company names, or import companies only.
If you are licensed to use Supplier Information Management then you can also assign profiles and import profile field information when importing companies.
Iasta Supplier Discovery
Iasta has spent the past 10+ years in the collaborative space between companies and their suppliers. Working extensively with many companies on both sides of the sourcing relationship gave us exposure to how organizations interact. We rolled our cumulative experience into a benefit for our users by creating a common ground for buyers and suppliers to find each other. All Iasta SmartSource users can access the Iasta Supplier Discovery directory at no additional charge!
Increase the number of suppliers in your network, generate more savings, and identify new sourcing opportunities with Iasta Supplier Discovery. No matter how solid your supply base, it's always good to know what your sourcing options are. Expanding your supplier network can increase the competitiveness of auctions, minimize shipping costs with geographically strategic suppliers, and enable you to groom potential suppliers to meet the evolving needs of your organization. Find new suppliers, along with detailed information describing who they are and what they do, in the Iasta Supplier Discovery directory. Click here for more information about finding and importing suppliers from Iasta Supplier Discovery.
Creating an Excel File to Import
Creating a spreadsheet with user, company, and company profile information is quite simple. Generally you will create separate columns for each type of data. If you make column headers that exactly match field names, the import will be able to automatically map the correct field to the column of the spreadsheet for you. If you do not use column headers or the headers are different from the field name then you can map each column manually. Create columns for the following data:
- Company Name (required)
- Keywords (optional)
- First Name (only required if importing users)
- Last Name (only required if importing users)
- Email Address (only applicable if importing users)
- Phone (only applicable if importing users)
- Notes (only applicable if importing users)
- Profile field data (Only available to Supplier Information Management users. Create one column for each profile field.)
»To import companies and users
- Click
 on the toolbar of the Sourcing workspace to open the Companies and Users window.
 - Select File > Import Companies and Users or click the Import Users button
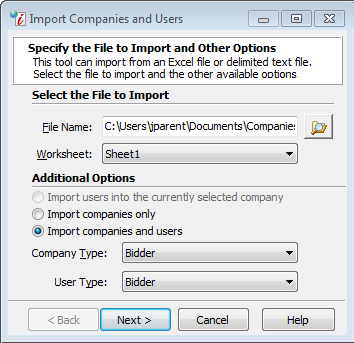
 on the toolbar. If you are importing users into an existing company, point to the company, right-click the mouse button and select Import Companies and Users from the shortcut menu to open the Specify the File to Import and Other Options window.

Enter Information in the following fields:
- File Name: Click the Browse button to open a window for browsing files. Select the file containing the import data and click Open. The selected filename appears in the File Name field.
- Worksheet: Iasta SmartSource populates the drop down menu with a list of worksheets in the selected spreadsheet file. Select the worksheet containing the data. A worksheet is a tab inside of the spreadsheet file.
- Additional Options: Select one of the following
- Import users into the currently selected company: Iasta SmartSource will import users from the spreadsheet into the company you selected on the Companies and Users window. Only available if you selected a company before opening the Import window.
- Import companies only: Creates companies. If you have access to Supplier Information Management you can also automatically assign profiles and import profile field information.
- Import companies and users: Creates both users and their companies in Iasta SmartSource based on data from the import sheet. You must include a column with the company name in your worksheet. If you have access to Supplier Information Management you can also automatically assign profiles and import profile field information.
- Company Type: Indicate whether the companies will sponsor projects or bid on projects. The company type dictates what kind of users can be created for the company, e.g. You cannot create bidder users in sponsor companies or system administrators in bidder companies.
- User Type: The types of users that appear in the drop down box depend upon the company type (sponsor or bidder) and the user type of the currently logged on user. These roles are the default roles provided when you install Iasta SmartSource with general descriptions of the permissions that are originally enabled for each role. Your Iasta SmartSource administrator has complete control over roles and permissions. Administrators can add and delete roles and enable/disable individual permissions for each role.
- Subdomain Administrator (sponsor company only): full access to all data in the subdomain, create other subdomains, create Project Administrator accounts, and full auction capabilities. Subdomain administrators can view and edit all of the projects in his or her subdomain(s) regardless of whether they have been invited by the project's owner.
- Project Administrator (sponsor company only):Create and administer projects, create user and bidder accounts, and attend other projects as a spectator, evaluator, or bidder.
- Spectator (sponsor) (sponsor company only) View projects in read-only mode from the point of view of the project sponsor. This user type allows sponsor peers to watch Live Events without being able to edit or create projects. If desired, the creator of a survey can assign a spectator as an evaluator of the survey.
- Bidder (bidder company only): In projects where they are an attendee, bidders can submit bids, view and respond to surveys, view forums, and pose forum questions.
- Click Next to open the Specify the Parameters for the Importation window.

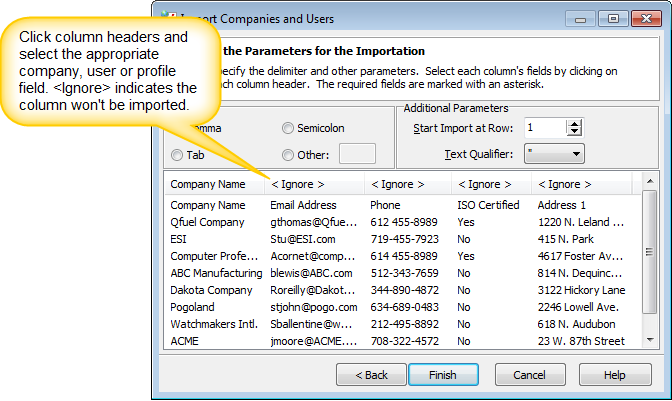
If the spreadsheet contained column headers that are identical to Iasta SmartSource field names, they will be automatically matched. Otherwise the column titles in the top row will be labeled "Ignore". This top row is where you will select field labels such as company name, user first name, etc. Scroll horizontally to see all the columns of data that are available for import. Any columns labeled as "Ignore" when you finish will not be imported. Below the column headers you can see the actual data that's available for import. .
Enter information in the following fields:
- Delimiter: Depending on the format of your import file, you may need to set the delimiter character. Usually the default is correct. Contact Iasta customer support for additional assistance.
- Start Import at Row: Select the number of the first row to import. This is the first row containing actual data, not label or header information. For example, if the spreadsheet you are importing has a header field, that would be row 1 and that row should not be imported. Therefore, you would select 2 to start importing at the second row.
- Text Qualifier: Depending on the format of your import file you could have to set an alternative text qualifier. Usually the default setting is correct. If you need more assistance with this setting, contact Iasta customer support.
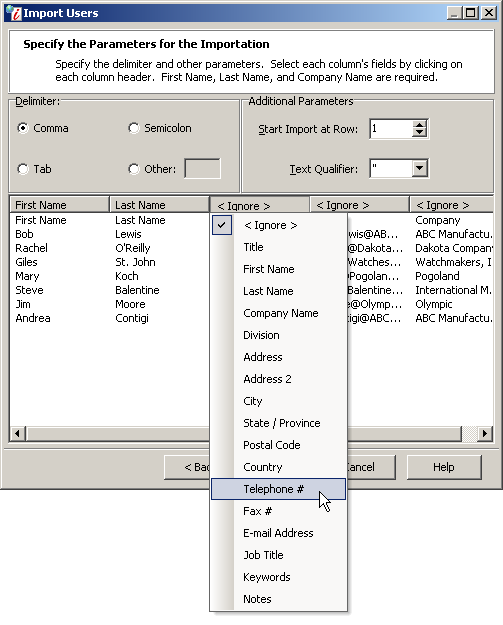
- Column Header row of spreadsheet display area: The default header row setting is "Ignore". Select <Ignore> to identify a label for a column that you want to import. Iasta SmartSource presents a menu showing the different types of user data that you can import. Select the appropriate label. Repeat this step for each column containing data that you want to import. Remember, any column that retains the "Ignore" column label will not be imported.

- Click Finish. Iasta SmartSource will import users, companies and data.
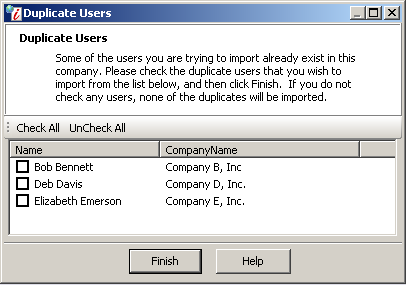
- If you attempt to import a user whose first and last name combination already exists in the same company, the Duplicate Users window appears.

Duplicate Users Window
Check each duplicate user that you wish to add.
Selected users will be imported into Iasta SmartSource with a default user ID incremented by 1. For example, when you add the first user in a company named John Doe, his default user ID is set to JDoe. If you add a duplicate user with the name John Doe to the same company, his user ID will default to "JDoe1." Click Finish. The new users appear on the Companies and Users window. User names and passwords are automatically assigned by Iasta SmartSource during import.
Related Topics