Use bidding spreadsheets to allow vendors to submit bids via an Excel spreadsheet. Follow these instructions to build the bidding worksheet before you enable Excel bidding in the Lots and Items page of your project.
»To create an Excel bidding worksheet
- Open the worksheet you plan to use as the template for vendors to submit pricing in Excel. You should include lot/item descriptions, volumes, and cells for vendors to enter pricing. If you have already created your lots and items in your SmartSource project, you can save time creating your spreadsheet by selecting the Lots node in your Connections and Projects tree, clicking
 on the toolbar, and selecting "Export Data to Excel" to create a spreadsheet with your lots and items. It is best to remove any pricing information and modify formatting before you map your lots and items to your spreadsheet.
If you use formulas in your bidding spreadsheet, there are some special guidelines to follow before you present the spreadsheet to your bidders. For more information, refer to Using Formulas in Bidding Spreadsheets.
NOTE: If there are links to different documents in the Excel spreadsheet, cell mapping will fail and Excel bidding in the Live Event will not work. We suggest uploading all supplementary documents as project attachments.
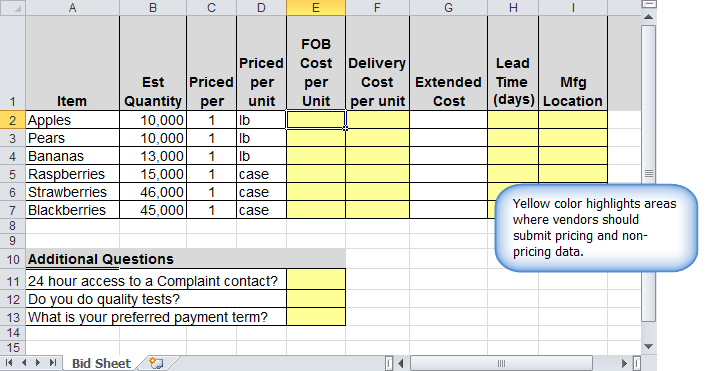
- In some cases you may want to add context to the price information you collect by having vendors submit non-price information such as lead-time, color, or manufacturing locations. If you want to collect additional information, make sure you create and label areas for vendors to enter that data as well. You'll be able to view submitted pricing alongside non-price factors in the Additional Fields tab when you export project data to Excel.
- Label columns and rows so vendors can easily understand the data you want them to submit.
- Select the cells where you want vendors to enter data and fill the selected cells with a color. Highlighting these cells helps vendors easily recognize all cells where they should be entering information.
If you are using formulas in the Excel file, Excel bidding will enable bidders to submit bids using the formulas. For more information about using formulas in your bidding spreadsheet, refer to Using Formulas in Bidding Spreadsheets.
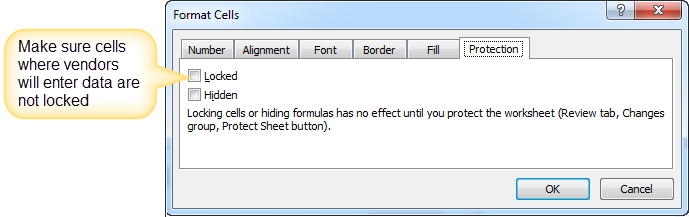
- To make sure that vendors can enter data in the cells, unlock them by: selecting all cells where vendors will enter data, click right mouse button and and selecting Format > Cells, then click the Protection tab and remove the check mark from the Locked check box to "unlock" the data entry cells.
- When you enable Excel bidding, you will map the individual cells where vendors will enter data to specific lots/items so it's important that vendors don't modify the arrangement or contents of any cells (other than entering data in the cells you have set up for that purpose). You can prevent users from changing the structure of a worksheet or altering the spreadsheet by protecting it. You can also specify a password that users must enter to modify the worksheet. To protect the bidding sheet you have created, select the Review tab in Excel's top navigation, and click Protect Sheet to open the Protect Sheet window.
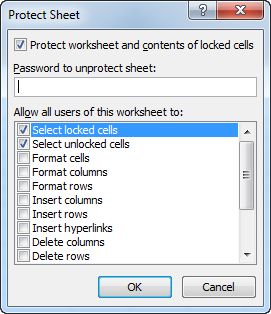
- In the Password to unprotect sheet field, type a password that will enable you to modify the spreadsheet if necessary then click OK.
- Save your bidding worksheet. You'll need it when you enable Excel bidding for your project so that you can map cells from the worksheet to the lots/items in your project. You will also want to Attach the spreadsheet to your project or distribute it to your bidders.
Related Topics