Use project cloning to replicate a project or several historical projects. Cloning a project enables you to recreate historical projects or customize demo projects. When you clone a project you can assign a new name and copy existing data such as, lots and items, attendees, bids, documents, attachments, surveys, the forum, and messages.
You can set a new start time for the cloned project which will automatically calculate updated dates and times associated with it (lot open times, preliminary bid deadlines, project timeline entries, Project Forum deadlines, etc.) according to the timeframes set up in the old project.
The cloned project's status defaults to the status of the original project. The status of all cloned surveys defaults to "unpublished."
After cloning a project, you can import a workflow into Project Management. Only Subdomain Administrators and the Project Owner can clone projects. Publish dates and attachment dates for cloned projects are updated to the date and time of the cloning activity.
»To clone a project
The project to be cloned must be accessible in the Current or Historical Projects branches of the Connections and Projects tree.
- Select and expand the project you want to clone in the Connections and Projects tree.
- Select Action > Clone Project to open the Clone Project window. Enter information in the following fields:
- Project Name: Enter a descriptive name for the cloned project.
- New Start Time: Enter the start time for the first lot group. Iasta SmartSource will use information from the source project to fill in the end time and the start and end times for other lot groups.
- Select the Project Components to Copy: Place a check mark next to each item you want to copy into the new project.
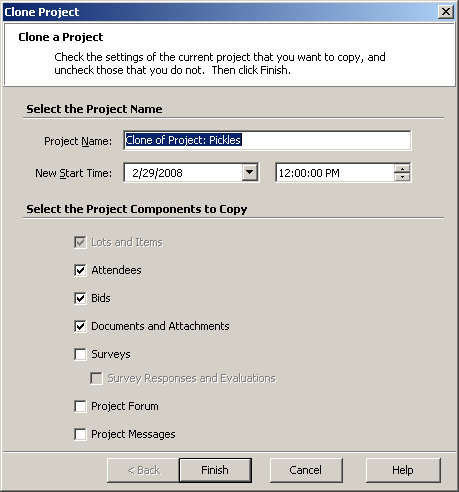
- Click Finish. A clone of the project is added to the Connections and Projects tree.
»To copy project triggers
Because of complicated date associations, triggers created in the project management module are not cloned along with their project. To save time when re-creating these triggers in the clone project, create, and then transfer, a Project Management template that includes trigger information.
- Select the original, cloned project in the Connections and Projects tree.
- Click
 on the toolbar to open the Project Management window.
 - From the File menu, select "Save Template As" to open the Save the Workflow Template window. Enter a name for the template and click OK. Exit the Project Management window
- Select and expand the clone project in the Connections and Projects tree and click on the toolbar to open the Project Management window.
- From the File menu, select "Open From Template" to open the Select a Workflow Template window.
- Select the template and click OK. Iasta SmartSource populate the Project Management window with items from the template.
»To change the project owner
Only subdomain administrators and Project Administrators are eligible to be project owners. Only one owner can be specified per project.
- Select and expand the project in the Connections and Projects tree, right-click and select Project Attendees open the Project Attendees page.
- Select the new owner's name in the Attendee list, click
 on the toolbar, and select Edit attendee properties to open the Attendee Properties window.
 - In the Access field, select Owner.
- Click Finish to save your changes and close the Attendee Properties page.
Related Topics