Part 1: Create the "Company Size" Custom Field with "Small," "Medium," and "Large" as the Field Options
»To access the Contract Management window
- Select a connection in the Connections and Projects tree.
- Click the Contract Management button
 on the toolbar to open Contract Management.
»To add a custom field
- Click the Contract Administration button on the toolbar to open the Contract Administration window. The Contract Fields tab lists all contract fields in the left pane and shows details about the selected field in the right pane.
- Click
 on the toolbar to open the Contract Field window.

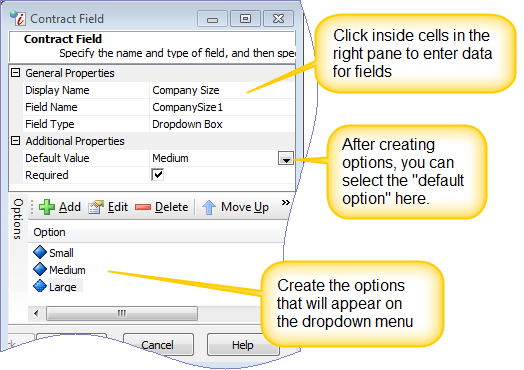
- In the Display Name field, type "Company size." This is the label that displays to users.
- In Field Type, select "Dropdown Box" so the field will present a dropdown list box with multiple options for users creating contracts.
- Place a check mark in the Required check box to indicate that the field requires a response from the user. If selected, the label appears in red with a red asterisk so users know they must provide a response in order to create the contract.
- In the Options area at the bottom of the page, click
 on the toolbar to create a new field option in the list. Type the name "small" in the text field provided then click anywhere outside the text field. Add two more field options: "medium" and "large."
 - The menu in the Default Value field up above is now populated with the field options you created (small, medium, and large). Select one of the options to be the default selection for the field.
- Click Finish.
Part 2: Create a Contract Type Called "Goods and Services"
»To add a contract type
- Open the Contract Types tab and click the New button
 on the toolbar.
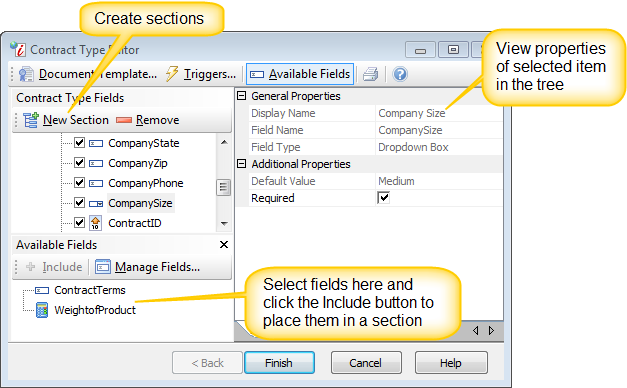
 - Contract Management opens the Contract Type Editor window. The panel in the upper left side of the window contains the Contract Type branch. The system properties of the contract type are displayed in the right pane. Enter a name for the contract type by clicking in the cell to the right of the Name label and typing in "Goods and Services".

- Click the New Section button
 on the toolbar to create a new section branch below the Contract Type. In the right pane, enter "Company Information" as the name for the section. Click back on the contract type in the upper left panel. When you select a section, the properties for that section are displayed in the right pane.
 - Select the Company Information section then select the Company Size field in the Available Fields panel in the lower left corner and click the Include button. Contract Management moves the field you selected to the Company Information section of the tree.
- Continue adding fields to this section or create new sections and then add fields to each section.
- Click Finish to return to the Contract Administration window then click Finish again to close Contract Administration. You can now create a Goods and Services contract.
Part 3: Create a Contract with a Contract Type of "Goods and Services"
»To add a contract
- Click
 on the toolbar to open the General Information page of Contract Properties.
 - In the Contract Type field, select "Goods and Services."
- In the Contract Name field, type "Example."
- Click Next to open Contract Attendees page. You are automatically added as the attendee with an owner role. Add other parties/users as needed and assign access roles. See Contract Parties and Attendees for more information.
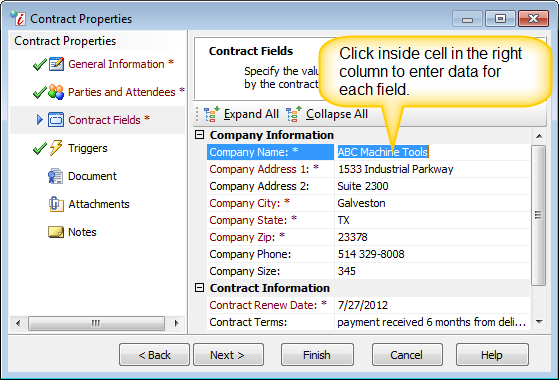
- Click Next to open the Contract Fields page. All custom contract fields are grouped into sections displayed on a single page. Each section can be individually expanded and collapsed to make viewing and entering data easier. Just click in the cell and type or select options from a menu, list, etc.

- When all required fields have been entered you can click Finish to save your contract or you use the remaining pages in Contract Properties to create and edit Triggers, Documents (Contract Authoring users only), Attachments, and Notes.
Navigating Contract Properties
The Contract Properties window includes several pages for editing and managing contract elements. Use the navigation pane on the left to go directly to a specific page or use the Back and Next buttons at the bottom of the window to navigate through each page in order.
Related Topics