All contract documents are generated from document templates associated with a contract type. The contract type must be created before you can set up its document template. See Defining Contract Types in Contract Administration for more information.
»To create a template for a contract type
- Open Iasta SmartSource and click the Contract Management button

- Click Contract Administration on the menu bar of the Contract Management window.
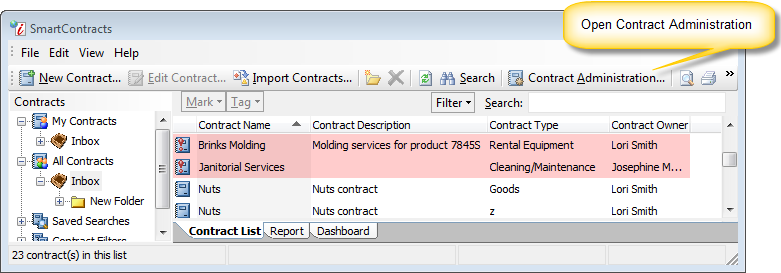
- Open the Contract Types tab.
- Select a contract type in the list and click the Edit button on the toolbar to open the Contract Type Editor.
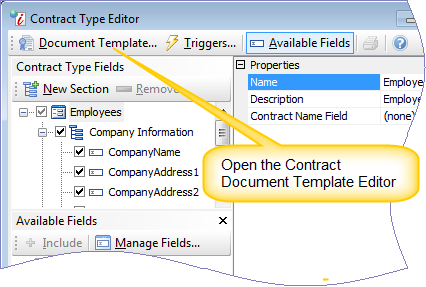
- Click the Document Template button on the toolbar to open the Contract Document Template Editor.
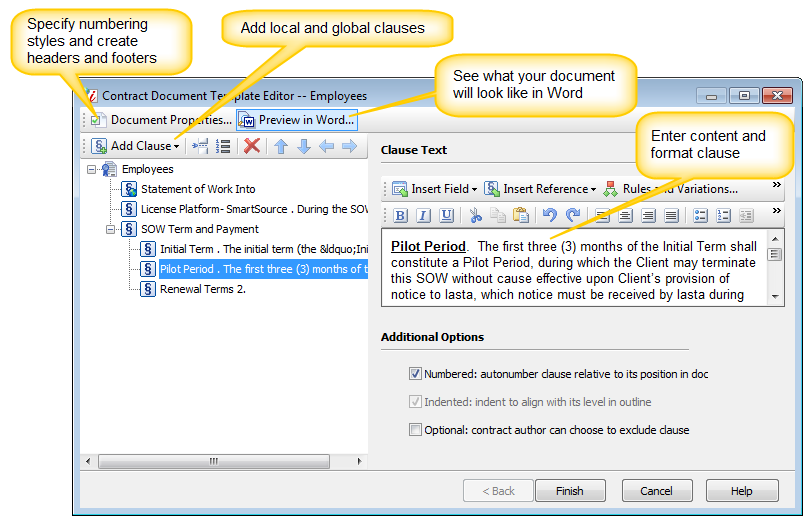
- Create local clauses by clicking the Add Clause button and selecting Local. A local clause is used exclusively by the current template which means it will be included when creating documents for the selected contract type but it won't be available to be included in templates for other contract types.
Enter the content in the text box in the right pane. Use standard formatting options on the toolbar above the text box to apply formatting to text. Other options for creating and formatting content are:
![]() : Insert a custom contract field into the body of the clause. Commonly used fields are: effective date, contract renewal date, company name, company address, customer support level, etc.
: Insert a custom contract field into the body of the clause. Commonly used fields are: effective date, contract renewal date, company name, company address, customer support level, etc.
![]() : Insert a reference to another clause within the contract document.
: Insert a reference to another clause within the contract document.
![]() : Create alternate variations of the clause that can be pulled by the template either based on a field selection or letting the author of the document choose from a list of options. For example, in a support contract you could have three levels of support, e.g. Silver, Gold, and Platinum that would require different content for the support clause. See Clause Rules & Variations for detailed information.
: Create alternate variations of the clause that can be pulled by the template either based on a field selection or letting the author of the document choose from a list of options. For example, in a support contract you could have three levels of support, e.g. Silver, Gold, and Platinum that would require different content for the support clause. See Clause Rules & Variations for detailed information.
![]() : Convert local clause to a global clause. Contract Management publishes it to the Clause Library where it can be added to any template. For more information on publishing clauses, see Making Local Clauses Global or Editing Global Clauses Locally.
: Convert local clause to a global clause. Contract Management publishes it to the Clause Library where it can be added to any template. For more information on publishing clauses, see Making Local Clauses Global or Editing Global Clauses Locally.
![]() : Create global text styles that are available for all templates and clauses.
: Create global text styles that are available for all templates and clauses.
![]() : Insert a table into the body of the clause. Contract Management includes standard options for editing and formatting tables such as Insert Row Before/After, Insert Column Before/After, and Merge/Split cells.
: Insert a table into the body of the clause. Contract Management includes standard options for editing and formatting tables such as Insert Row Before/After, Insert Column Before/After, and Merge/Split cells.
When you finish creating content go to the Additional Options area below the text box where you can:
- Autonumber clause relative to its position in the template.
- Indent the clause to align with other clauses at the same level.
- Make the clause optional, which means each time a contract is generated, the user chooses whether or not to include the clause.
- To add an existing clause from the library or to create a new global clause, click the Add Clause button and select From Library. Contract Management opens the Clause Library.
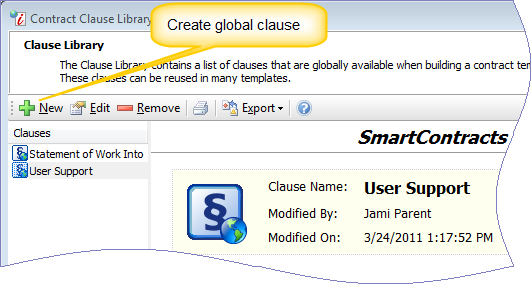
Global clauses are stored in the Contract Management Clause Library and are available to be included in any template. Global clauses offer many content management benefits such as accelerating content creation. You enter text one time and re-use it wherever that content is needed. You can include the clause in many different templates and each template produces many individual contract documents. The clause library also helps standardize content across multiple contracts. When you make changes to a clause in the library, any contract generated from any template containing the clause pulls the updated content.
Add an existing clause by selecting it in the clause list and clicking OK. To add a new clause to the library, click New on the Clause Library toolbar. Contract Management opens the Clause Properties window where you can enter a name and description for the global clause. Click OK to open the Clause Editor where you can enter and format content.
Note: a global clause can include multiple hierarchically arranged sub-clauses. Subclauses can consist of other global clauses or a "local" subclause which means the content is only available inside the global clause. You can convert a local subclause to a global clause by clicking the Edit globally button in the right pane of the Clause Editor.
Click Finish to save the clause to the library and return to the Clause Library window. Select the clause in the Clauses list and click OK to add it to the template.
- Setup the structure of the clauses within the document in the left pane. Numbered clauses and subclauses are automatically numbered according to the order and level of items in the tree. For instance, Level one clauses could be numbered 1, 2, 3... and level two clauses could use a, b, c... format.
![]() : Adjust the order of clauses by moving the selected clause up or down in the tree.
: Adjust the order of clauses by moving the selected clause up or down in the tree.
![]() : Modify the hierarchy by changing the level of the selected clause.
: Modify the hierarchy by changing the level of the selected clause.
![]() : Insert a forced page break in the document.
: Insert a forced page break in the document.
![]() Restart Numbering: Restart the numbering of a level. For example, if the last level two was "f" but you want the next level two to restart at "a" rather than continue to "g", you can insert a restart numbering format object in the tree before the new "a" item.
Restart Numbering: Restart the numbering of a level. For example, if the last level two was "f" but you want the next level two to restart at "a" rather than continue to "g", you can insert a restart numbering format object in the tree before the new "a" item.
![]() : Open the Document Properties window where you can build headers and footers and format numbering styles for each level.
: Open the Document Properties window where you can build headers and footers and format numbering styles for each level.
- Contract documents are generated in Microsoft Word format. Click the Preview in Word button on the toolbar to open Word with a preview of how the document will look in Microsoft Word.
- Click Finish to save the template and return to the Contract Type Editor. When users create a contract for this contract type they can generate a contract document from this template.
Related Topics
Making Local Clauses Global or Editing Global Clauses Locally.