You can create a hierarchy of questions by creating sub-questions below questions. You can add as many levels of sub-tables as you like.
»To add a table sub-question
- Select and expand the project in the Connections and Projects tree and click the Surveys branch.
- Iasta SmartSource displays a list of the project's surveys in the right pane. Click the Edit link under a survey to open it in the Survey Editor.
- Select the question where you want to place the sub-question on the Survey Editor window. Click
 on the toolbar or right-click on the question you want to work with and select New Table Question > New Table Sub-Question. A new sub-question is added to the existing question and the right side of the window becomes available. You can undock and expand the Table Editor by clicking the heading and dragging it to another area of your screen.
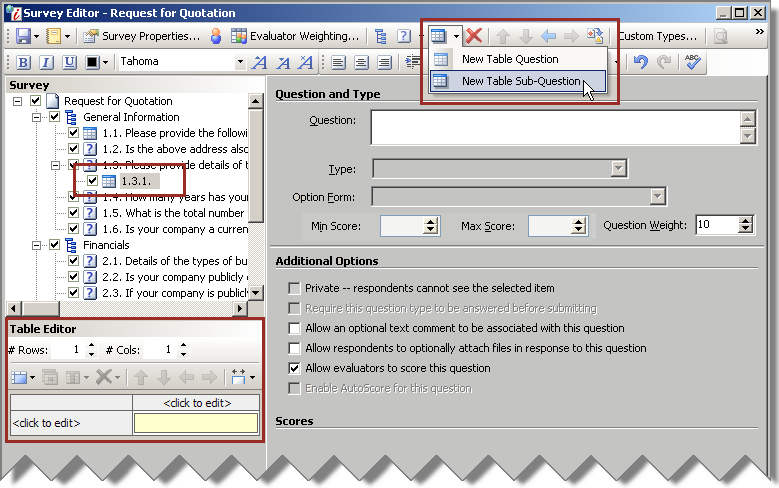
- Enter information in the following fields in the right pane:
- Question: Enter text to form the question that will be presented to survey respondents.
NOTE: All question text is double spaced by default. To force single spacing within the question text, hold down the SHIFT key on your keyboard at the same time you press ENTER for another line. See Formatting Survey Question Text for more information.
- Max Score: Select the maximum score evaluators can assign for this question. If you don't enter a value here, evaluators have no limit. (Only available for questions allowing Evaluators to score.)
- Min Score: Select the minimum score evaluators can assign for this question. If you don't enter a value here, evaluators have no minimum limit. (Only available for questions allowing Evaluators to score.)
- Question Weight: Enter question weight relative to other questions in the section. Unlike section weights (which must total 100), they do not have to add up to a specific number. For more information, see Weighting Sections and Questions.
- Private--Respondents cannot see the selected item: Only evaluators see the question. You might use this option if you want evaluators to enter a score based on a group of identified responses without the respondents knowing.
- Allow an optional text comment to be associated with this question: Permit respondents to include a message to accompany their answer to the question. For example, if the question type is Numeric, this option provides an additional text entry field for respondents to enter text messages explaining their answers. (not applicable to Statement questions)
- Allow respondents to optionally attach files in response to this question: Permits respondents to upload a file to accompany the answer. For example, if the question type is Yes/No/Future, and the respondent selects Future, this option enables the respondent to upload a file describing future plans. If you make the question required AND allow optional attachments, an attachment is not required to submit a survey response. (not applicable to Statement or Attachment questions)
- Allow evaluators to score this question: Permit evaluators to score the question when evaluating a survey response from a bidder. If AutoScore is enabled and an evaluator enters a different score than the AutoScore, the evaluator's score overrides the AutoScore when Iasta SmartSource calculates the question's Average Score. (not applicable to Statement questions)
- Format the table by creating the right number of rows and columns. Click
 on the toolbar to insert a row or column into the table. Press ENTER or TAB. Click "<click to edit>" in the row or column header to enter text.
When the row or header text is selected: , type the column or row header text. Row and column headers can be turned "on" and "off." Click
  on the Table Editor toolbar to tag row headers and column headers as viewable or non-viewable. Press ENTER or TAB.
NOTE: To go back and edit the properties of the main question, click anywhere in the right hand side of the window or Select the main question in the Survey tree.
Table Editor
- Specify cell question properties by selecting the cell. Iasta SmartSource presents fields for configuring the cell question in the right pane. Enter information about the cell question in the following fields:
- Type: Select the format of the question and response from the drop down menu.
- Statement: Creates a section that provides instructions or other information to respondents without allowing a response.
- Short Answer: Typically used when the answer should be in a short text format, such as a sentence or single paragraph.
- Long Answer: Used when the answer should be in a longer text format, such as multiple paragraphs.
- Numeric: Forces respondents to enter a numerical answer. You can define ranges of numbers to use with AutoScore.
- Attachment: Allows respondents to attach a file as their answer. For more information on attachments, refer to Question Attachments. If an attachment type question is marked required, respondents MUST upload a file before Iasta SmartSource will allow them to submit their response.
NOTE: You can also allow respondents to attach a file in addition to their answer by selecting "Allow respondents to optionally attach files in response to this question" check box. In this case, the attachment is always optional for the respondent.
- Custom Types: Any "Yes/No/Other," or other multiple choice question is a custom type. Several custom types are pre-defined, but you can also create additional custom types. For more information, refer to Custom Types Questions.
- Option Form: Select the format of the question and response from the drop down menu. (custom type questions only)
- Radio List: Options are presented to survey respondents as a radio button list.
- Drop-Down List: Options are presented to survey respondents in a drop-down menu.
- Check List: Options are presented to survey respondents in a multi-select check list.
- Units: Enter the units in which respondents should be responding. (numeric questions only)
- Minimum: Enter the minimum value that respondents can enter when replying to this question. (Numeric questions only)
- Maximum: Enter the maximum value that respondents can enter when replying to this question. (Numeric questions only)
- Significant Digits: Enter the number of digits to the right of the decimal point that you want to allow. For example, an amount with a significant digit of "2" will display (and used in calculations) with two decimal places (rounded to the nearest 100th).
- Max Score: Select the maximum score evaluators can assign for this question. If you don't enter a value here, evaluators have no limit. (Only available for questions allowing Evaluators to score.)
- Min Score: Select the minimum score evaluators can assign for this question. If you don't enter a value here, evaluators have no minimum limit. (Only available for questions allowing Evaluators to score.)
- Question Weight: Enter question weight relative to other questions in the section. Unlike section weights (which must total 100), they do not have to add up to a specific number. For more information, see Weighting Sections and Questions.
- Max Characters: Enter the maximum number of characters a respondent can answer when replying to this question. (Short and Long Answer questions only)
- Private--Respondents cannot see the selected item: Only evaluators see the question. You might use this option if you want evaluators to enter a score based on a group of identified responses without the respondents knowing.
- Require this question type to be answered before submitting: If checked, Iasta SmartSource will not accept the survey response unless this question has been answered. For example, if the question type is Short Answer and the question allows the respondent to upload an optional attachment file as a supporting document, Iasta SmartSource will reject a respondent's attempt to submit the response if he or she only attaches a document and does not answer the Short Answer question. (not applicable to Statement questions)
NOTE: Use caution when making checklists required. Respondents must check at least one item in the list in order to submit their response. For cases where NO selection is a potentially correct response, you should either make the question optional (do not select this check box) or create a "None of the above" or "Not applicable" option in the checklist so that suppliers can answer the question correctly and still meet the requirement.
- Allow an optional text comment to be associated with this question: Permit respondents to include a message to accompany their answer to the question. For example, if the question type is Numeric, this option provides an additional text entry field for respondents to enter text messages explaining their answers. (not applicable to Statement questions)
- Allow respondents to optionally attach files in response to this question: Permits respondents to upload a file to accompany the answer. For example, if the question type is Yes/No/Future, and the respondent selects Future, this option enables the respondent to upload a file describing future plans. If you make the question required AND allow optional attachments, an attachment is not required to submit a survey response. (not applicable to Statement or Attachment questions)
- Allow evaluators to score this question: Permit evaluators to score the question when evaluating a survey response from a bidder. If AutoScore is enabled and an evaluator enters a different score than the AutoScore, the evaluator's score overrides the AutoScore when Iasta SmartSource calculates the question's Average Score. (not applicable to Statement questions)
- Enable AutoScore for this question: Only available for Numeric and Custom question types. If checked, Iasta SmartSource automatically scores responses based on the answer given and the corresponding scores specified in the Scores section at the bottom of this page. For example, if the question type is Yes/No/Other, and the maximum value is 10, you could assign a default score of 10 for "Yes," 5 for "Other," and 0 for "No."
- Scores: Scores are only available to questions with AutoScore enabled. Enter the default scores that AutoScore will use for each possible answer to the question. For custom types, you'll see a small grid like the one below displaying the configured options. Enter the value for the score next to each option. For instructions on setting up scoring for numeric ranges for Numeric type questions, see Numeric Questions.
»To copy a table cell
- Select the table cell that you want to copy.
- Click the Copy Table Cell button
 on the toolbar to open the Copy Table Cell Properties window with the cell to be copied outlined in red.
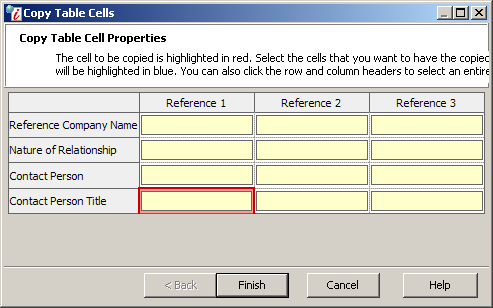
Copy Table Cell Properties Window
- Click the cell where you want to place the information from the cell you copied. the selected cells are outlined in blue.
NOTE: You can also click the row or column header to select an entire row or column.
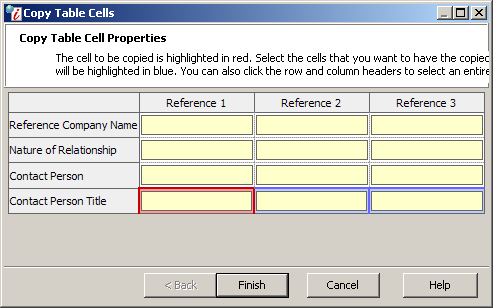
Copy Table Cell Properties Window
- Click Finish. See Table Question Example for more help on setting up table questions.
About Resizing
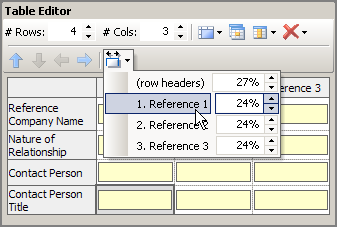
No matter how long the text is within a row or a column header, the Table Editor automatically equalizes their widths. However, if you would like change this default sizing method, there are two ways to resize rows and columns within the Table Editor.
- Hover over the area you want to move. The cursor changes to a double-sided arrow and you can move the row or column markers at will.
- For a more fine-tuned adjustment, click
 on the Table Editor toolbar and enter specific column or row percentages, as necessary: